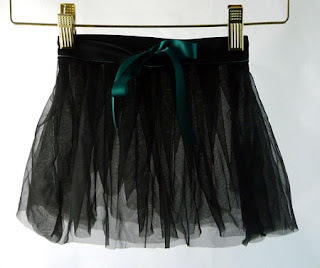
I just whipped up this beautiful chiffon tutu! It came out WAY smaller than I intended, but over all I'm quite happy!
Tuesday, March 30, 2010
Thursday, March 25, 2010
Clothing Design A-Go-Go!!!
So I'm still honing my mad skills! I just sewed up my cutesy 3 to 6 month baby pants!! Totally cute and AWESOME!!! I haven't finished the hem on the cuff, and elastic we'll just call a learning experience :) But here we GO!!!
Check out those cute little darts!!! Elastic waste band for perfect fit and easy diaper changes!!
Check out those cute little darts!!! Elastic waste band for perfect fit and easy diaper changes!!
Wednesday, March 24, 2010
My First Pattern!
This is a baby dress size 3 to 6 months. My own original design! Yay!
This is the front piece!
This is the back piece! Cut 2!
My completed dress front!
And the completed dress back!
This is the front piece!
This is the back piece! Cut 2!
My completed dress front!
And the completed dress back!
Tuesday, March 23, 2010
Get Organized!!!
I like to be organized! Here are some tips that have helped me!
I bought these magazine folders from IKEA. I bought 2 sets of 5. I then covered them, using glue and cotton muslin. They now look like this:
Each holder now houses a different type of pattern! I have crocheted, knit, sewing, lace patterns and even copy and construction paper!
I have also made a few muslin tote bags! These have appliques of their contents! Each picture represents what you will find on the inside!
These were SUPER easy to sew. I eyeballed the size and construction. Fast and easy! Good luck with your organizing!
Sunday, March 21, 2010
Spider Bracelet Tutorial LAST PART!!
We'll start with the spider legs!
1. Attach a new thread and come out corner black bead. Add two beads and sew through the corner bead and first bead strung.
2. Pull thread through.
3. Add two new beads and secure. Repeat until you have a total of 5 rows of 2 beads.
4. Add 2 beads. Now we're turning the leg! Thread through 2 beads from last 2 rows.
5. Pull through like so and reinforce by sewing through a couple times. Continue for a total of 4 rows.
6. Insert needle into the 4 silver bead. Secure leg by sewing through black beads and single silver bead.
7. Secure thread and exit second black bead on same edge. Add 2 beads. Attach by sewing downward into adjacent bead. Thread through first bead.
8. Add 2 beads and complete row two. Repeat for a total of 5 rows. Then repeat turned leg of first leg.
9. Reinforce leg end by sewing through a couple times.
10. Complete all 8 legs! Spider is finished!! Yay!! Now for the web!
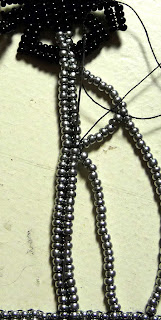
11. Secure thread 2 beads below leg connection facing bracelet. Add a generous amount of beads to reach the bracelet. This will vary depending on your bead size. In this example, I added 39.
12. Thread needle through the 8th bead from the center strip.
13. So back up the 7th bead from the center strip.
14. Sew through the newly strung beads.
15. Secure to original base bead.
16. Sew down 1/4 of strung beads.
17. Add some beads. Will vary based on bead size. I added 8. Secure about in one bead about 1/3 below spider of the double chain.
18. Secure by threading through again.
19. Thread back through and poke out the adjacent bead towards the bracelet band!
20. Add a few beads. This will vary. I added 23. Sew down into the 4th bead from the double strand.
21. Sew back up to secure.
22. Secure in original bead! Sew downward in double strand the middle 3rd of the double strand.
23. Add a few beads. Will vary. I added 6. Sew through middle of adjacent single strand.
24. Add a few more beads. Will vary. I added 9. Secure about 2/3rds last single strand.
25. Sew back to intersecting strands. Secure.
26. Reinforce and secure. Repeat web on the opposite side! And we're DONE!!!
Subscribe to:
Comments (Atom)


